一切从对象开始。在Java中Object类是是所有类的父类,也是根类。它一共有11个方法。
 1
 2
 3
 4
 5
 6
 7
 8
 9
10
11
12
13
14
15
16
17
18
19
20
21
22
23
24
25
26
27
28
29
30
31
32
33
34
35
36
37
38
39
40
|
public final native Class<?> getClass();

public native int hashCode();

public boolean equals(Object obj) {
  return (this == obj);
}

protected native Object clone() throws CloneNotSupportedException;

public String toString() {
  return getClass().getName() + "@" + Integer.toHexString(hashCode());
}

public final native void notify();

public final native void notifyAll();

public final native void wait(long timeout) throws InterruptedException;

public final void wait(long timeout, int nanos) throws InterruptedException {
  if (timeout < 0) {
    throw new IllegalArgumentException("timeout value is negative");
  }

  if (nanos < 0 || nanos > 999999) {
    throw new IllegalArgumentException("nanosecond timeout value out of range");
  }

  if (nanos > 0) {
    timeout++;
  }
  wait(timeout);
}

public final void wait() throws InterruptedException{
  wait(0);
}

protected void finalize() throws Throwable {  }
|
其中getclass,hashCode,clone,notify,notifyAll,wait(long timeout)是native的方法,在C/C++层实现;hashCode,equals,clone,toString,finalize这五个方法没有被final修饰,可以被子类重写,其他方法都无法重写。
接下来将会一个一个的分析,主要参考了Object类中的Java Doc。
getClass
getClass方法返回运行时的Class对象。更准确的返回类型应该是Class<? extends X>。注意这里是运行时,而不是编译时的。所以看一下的代码:
1
2
3
4
|
Number n = 0;
Class<? extends Number> c = n.getClass();
System.out.println(c.getName());
System.out.println(n.getClass().getName());
|
两个输出语句都会输出java.lang,Integer,很好的说明了返回的Class是运行时的,因为Java中数值的默认实现是Integer类型的。
hashCode
hashcode方法返回一个hash值,HashMap就是利用这个方法来构建的。
Object类中的hashCode保证为每一个不同的对象返回不同的hash值,它是通过把对象的内存地址转化为Integer来实现的,不同对象的内存地址当然不同,所以肯定会返回不同的hash值。但是如果子类重写了hashCode方法,那就不一定了。
hashCode的设计准则如下:
- 在一次运行过程中,
hashCode的返回值必须返回相同的值。但是没有必要在另一次运行中也保持不变。
- 如果两个对象相等(根据
equals方法判断),那么它们的hashCode返回值也相等。
- 如果两个对象不相等(
equals方法判断),它们的hashCode返回值可以相等。但是必须意识到,返回不相等的值可以提高哈希表应用(比如HashMap)的性能。
为了更加清楚的理解这些准则,我们来看一下hashCode在HashMap中应用。
 1
 2
 3
 4
 5
 6
 7
 8
 9
10
11
12
13
14
15
16
17
18
19
20
21
22
23
24
25
|
  static class Coffee {
    String name;
    boolean hasSugar;

    public Coffee(String name, boolean hasSugar) {
      this.name = name;
      this.hasSugar = hasSugar;
    }

    @Override
    public int hashCode() {
      return name.hashCode();
    }
  }

  public static void testHashCode() {
    HashMap<Coffee, Integer> map = new HashMap<>();
    Coffee coffee1 = new Coffee("bar", false);
    Coffee coffee2 = new Coffee("bar", true);

    map.put(coffee1, 123);
    map.put(coffee2, 123);
    map.put(coffee2, 124);
    System.out.println(map.size());
  }
|
最终map里会有两个元素。Coffee类重写了hashCode方法,我们想要一个这样的咖啡类:如果名字相同相同,它们就是同一个对象。所以hashCode方法中只是取name的hashCode。但是map为什么会有两个元素呢?因为HashMap判断两个key是否重复的逻辑如下:
1
|
if (p.hash == hash && ((k = p.key) == key || (key != null && key.equals(k))))
|
就是key的hash值一样,并且key的内存地址相等(同一个对象)或是key的equals方法返回值相同。Java中没有运算符重载,==默认就是比较两个对象的内存地址。
上面的Coffee类没有重写equals方法,所以不同的Coffee对象它们的equals返回值肯定不同。那么上面的coffee1和coffee2虽然它们的hashCode相同,但是equals不同,所以是两个不同的key。同时它们还是在HashMap的同一个桶中的(这一部分在下次讲HashMap的时,还会详细的讲),也就是在同一条链表下,所以在查找的时候需要遍历链表,造成性能的损失。只要重写Coffee的equals方法即可:
1
2
3
4
5
6
7
|
    @Override
    public boolean equals(Object o) {
      if (this == o) return true;
      if (!(o instanceof Coffee)) return false;
      Coffee coffee = (Coffee) o;
      return Objects.equals(name, coffee.name);
    }
|
这就是上述的第三条准则:当两个对象不相等(equals方法判断)时,它们的hashCode返回值可以相等。但是必须意识到,返回不相等的值可以提高哈希表应用(比如HashMap)的性能。
还有另一种情况是,equals返回值相同,hashCode的返回值不同。这就违背了第二条准则。比如这种奇葩的hashCode方法:
1
2
3
4
|
    @Override
    public int hashCode() {
      return Objects.hash(name, hasSugar) + new Random().nextInt(100);
    }
|
这会导致本来是两个相等的对象在HashMap中有两个实例,这也就不符合HashMap的属性了。
为了有一个可以正常使用的HashMap,我们在编写实体类的时候,必须保证equals方法的返回值相同时,hashCode也相同。反之,最好也保证hashCode相同时,equals方法返回值也相同,这样可以提高性能。所以建议两个方法一起重写,如果没有特殊要求的话,比较和hash所有的字段。
equals
Object的equals比较的是两个对象的内存地址。Object类的equals方法对于任何非空引用值x和y,当x和y引用同一个对象时,此方法才返回true。这个也就是我们常说的地址相等。
如果重写了equals方法,通常有必要重写hashCode方法,已经在hashCode方法中详细讲了。
clone
clone方法创建并返回当前对象的一份拷贝。一般情况下,对于任何对象 x:
- 表达式
x.clone() != x 为true。
x.clone().getClass() == x.getClass() 也为true。- 最好使得
x.clone().equals(x)也为true。不过这些都不是硬性要求。
Object本身没有实现Cloneable接口(Cloneable是一个空接口,实现拷贝还需要重写clone方法),如果子类没有实现Cloneable接口而调用clone的话会产生CloneNotSupportedException异常。
拷贝分为浅拷贝和深拷贝,即shallow copy和deep copy。在JavaDoc中也有相关的说明,下面详细的解释一下。
Shallow copy
Object的clone方法就是shallow copy的,那么什么是shallow copy呢?
Otherwise, this method creates a new instance of the class of this
object and initializes all its fields with exactly the contents of
the corresponding fields of this object, as if by assignment; the
contents of the fields are not themselves cloned. Thus, this method
performs a “shallow copy” of this object, not a “deep copy” operation.
就是说,浅拷贝产生的对象的字段本身是没有被拷贝,如果字段是原始类型和不可变的类型是没有问题的(比如:int,float,String等)。如果字段包括可变的对象,那么浅拷贝产生的对象中的该字段的引用是和原对象相同的。
我们接着Coffee的例子,实现Cloneable接口,重写clone方法:
 1
 2
 3
 4
 5
 6
 7
 8
 9
10
11
12
13
14
15
16
17
18
19
20
21
|
  static class Bar implements Cloneable {
    public Bar() {
      super();
    }
	static class Coffee implements Cloneable {
    String name;
    boolean hasSugar;
    Bar bar;

    public Coffee(String name, boolean hasSugar, Bar bar) {
      this.name = name;
      this.hasSugar = hasSugar;
      this.bar = bar;
    }

    @Override
    protected Coffee clone() throws CloneNotSupportedException {
      Coffee c = (Coffee) super.clone();
      return c;
    }
  }
|
编写测试方法:
 1
 2
 3
 4
 5
 6
 7
 8
 9
10
11
12
|
  static void testClone() {
    Coffee coffee = new Coffee("coffee", false, new Bar());

    try {
      System.out.println(coffee.clone() == coffee);
      System.out.println(coffee.clone().getClass() == coffee.getClass());
      System.out.println(coffee.clone().equals(coffee));
      System.out.println("shallow copy? " + (((Coffee) coffee.clone()).bar == coffee.getBar()));
    } catch (CloneNotSupportedException e) {
      e.printStackTrace();
    }
  }
|
输出为:
1
2
3
4
|
false
true
true
shallow copy? true
|
前三条输出表明Coffee类是符合三条准则的。最后一条输出语句测试Coffee类是否是浅拷贝的,也就是判断bar对象是否为同一个引用,结果表明它们是同一个对象,所以Object的clone方法,不会拷贝对象字段,而是直接使用同一个引用。这就是浅拷贝了。
Deep copy
**深拷贝使得拷贝的对象和原对象没有相同的引用,而只是值相等。**要实现深拷贝很简单,只要重写创建一个bar对象即可,这样就是不同的引用了。也可以直接调用bar的clone方法进行拷贝。
 1
 2
 3
 4
 5
 6
 7
 8
 9
10
11
12
13
14
15
16
17
18
19
|
  static class Bar implements Cloneable {
    public Bar() {
      super();
    }

    @Override
    protected Object clone() throws CloneNotSupportedException {
      return super.clone();
    }
  }
	static class Coffee implements Cloneable {
    @Override
    protected Coffee clone() throws CloneNotSupportedException {
      Coffee c = (Coffee) super.clone();
      c.bar = (Bar)bar.clone();
      //c.bar = new Bar();
      return c;
    }
  }
|
但是这样实现的深拷贝有几个明显的缺点,如果是我们使用的是第三方库呢?怎么拷贝它们?你可能会说可以继承它们并且实现自己的equals方法。那么如果有private字段呢,如果类被final修饰呢?如果有泛型呢?O.O
序列化实现深拷贝
执着于clone方法,没有什么好的解决办法。这篇博客介绍了一种更加快速方便的实现deep clone的方法。主要是利用 Java Object Serialization 的技术,使用Serializable接口来帮我们完成工作。使用ObjectOutPutStream来序列化对象,ObjectInputStream反序列话对象从而得到对象的拷贝。
 1
 2
 3
 4
 5
 6
 7
 8
 9
10
11
12
13
14
15
16
17
18
19
20
21
22
23
24
25
26
27
|
public class DeepCopy {

  /**
   * Returns a copy of the object, or null if the object cannot
   * be serialized.
   */
  public static Object copy(Object orig) {
    Object obj = null;
    try {
      // Write the object out to a byte array
      ByteArrayOutputStream bos = new ByteArrayOutputStream();
      ObjectOutputStream out = new ObjectOutputStream(bos);
      out.writeObject(orig);
      out.flush();
      out.close();

      // Make an input stream from the byte array and read
      // a copy of the object back in.
      ObjectInputStream in = new ObjectInputStream(
          new ByteArrayInputStream(bos.toByteArray()));
      obj = in.readObject();
    } catch (IOException | ClassNotFoundException e) {
      e.printStackTrace();
    }
    return obj;
  }
}
|
当然这种方法也是有不足的:
- 需要实现
java.io.Serializable接口。幸运的是,Serializable也是空接口,Java提供序列化的默认实现。
- Java对象的序列化和反序列是比较慢。
- ByteArrayOutputStream 是线程同步的,也比较慢。
原博中还实现了这种方便的改进,主要是实现了自己的ByteArrayOutputStream和ByteArrayInputStream来提供效率,这里不再介绍,如果对性能没有很高的要求,或者拷贝使用的不频繁的话使用没有优化的这种方法已经够了吧。
下面是深拷贝(使用Serializable实现)和浅拷贝的速度测试:
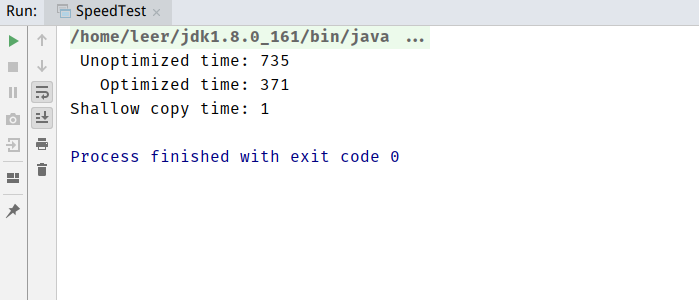
一般情况下,我还是倾向于在clone方法中实现自己的深拷贝。如果对象特别复杂。字段特别多的情况下可以使用序列化的方式。
toString
Object的默认实现方式为:类名+@+hashCode的十六进制表示。
1
2
3
|
public String toString() {
  return getClass().getName() + "@" + Integer.toHexString(hashCode());
}
|
子类可以重写这个方法,使得以简明易读的方式展示这个对象,推荐所以子类都重写这个方法。
接下来的五个方法:notify,notifyAll,wait,都是和多线程相关的。要执行这些方法都需要当前的线程是该对象的监视器,否则会抛出java.lang.IllegalMonitorStateException异常。
notify
notify方法唤醒一个在此对象监视器上等待的线程(监视器相当于就是锁的概念)。如果有多个的线程都在此对象上等待,那么只会选择一个线程。选择是任意性的。调用wait方法可以使一个线程在该对象监视器上等待。
只有当前线程放弃对象上的锁之后,被唤醒的线程才可以继续处理。notify方法只能被作为此对象监视器的所有者的线程来调用。一个线程要想成为对象监视器的所有者,可以使用以下3种方法:
- 执行对象的同步实例方法
- 使用synchronized内置锁
- 对于Class类型的对象,执行同步静态方法
一次只能有一个线程拥有对象的监视器。如果当前线程不是该对象监视器的所有者,会抛出IllegalMonitorStateException异常。
notifyAll
notifyAll和notify方法类似,不过它是唤醒所有在该对象监视器上的线程。
wait(long timeout)
wait(long timeout, long nanos)
wait()
wait方法有三个变种。wait使当前进程阻塞,直到该对象调用notify或notifyAll方法。利用notify和wait方法可以模拟生产者消费者问题。
 1
 2
 3
 4
 5
 6
 7
 8
 9
10
11
12
13
14
15
16
17
18
19
20
21
22
23
24
25
26
27
28
29
30
31
32
33
|
  static class Factory {
    private static final int BUFFER_SIZE = 100;
    private int currentNum = 0;

    public void consume(int num, String name) throws InterruptedException {
      synchronized (this) {
        while (currentNum - num < 0) {
          System.out.println(name + ": waiting...");
          this.wait();
        }
        // consume num product
        currentNum -= num;
        System.out.println(name + ": consume: " + num + ", left: " + currentNum);
        // notify producer
//        this.notifyAll();
        this.notify();
      }
    }

    public void product(int num, String name) throws InterruptedException {
      synchronized (this) {
        while (currentNum + num > BUFFER_SIZE) {
          System.out.println(name + ": waiting...");
          this.wait();
        }
        currentNum += num;
        System.out.println(name + ": product: " + num + ", left: " + currentNum);
        // notify consumer
//        this.notifyAll();
        this.notify();
      }
    }
  }
|
这里使用synchronized语句锁住Factory对象,使得当前调用这个方法的进程成为该对象的监视器,从而可以调用wait,notify或notifyAll方法。
 1
 2
 3
 4
 5
 6
 7
 8
 9
10
11
12
13
14
15
16
17
|
  static class Producer implements Runnable {
    private Factory factory;
    private int num;

    public Producer(Factory factory, int num) {
      this.factory = factory;
      this.num = num;
    }
    @Override
    public void run() {
      try {
        factory.product(num, Thread.currentThread().getName());
      } catch (InterruptedException e) {
        e.printStackTrace();
      }
    }
  }
|
 1
 2
 3
 4
 5
 6
 7
 8
 9
10
11
12
13
14
15
16
17
18
|
  static class Consumer implements Runnable {
    private Factory factory;
    private int num;

    public Consumer(Factory factory, int num) {
      this.factory = factory;
      this.num = num;
    }

    @Override
    public void run() {
      try {
        factory.consume(num, Thread.currentThread().getName());
      } catch (InterruptedException e) {
        e.printStackTrace();
      }
    }
  }
|
测试代码:
 1
 2
 3
 4
 5
 6
 7
 8
 9
10
11
12
|
  public static void main(String[] args) {
    Factory factory = new Factory();
    new Thread(new Consumer(factory, 10), "Consumer1").start();
    new Thread(new Producer(factory, 5), "Producer1").start();
    new Thread(new Producer(factory, 5), "Producer2").start();
    new Thread(new Producer(factory, 20), "Producer3").start();
    new Thread(new Producer(factory, 30), "Producer4").start();
    new Thread(new Consumer(factory, 20), "Consumer2").start();
    new Thread(new Consumer(factory, 5), "Consumer3").start();
    new Thread(new Consumer(factory, 5), "Consumer4").start();
    new Thread(new Consumer(factory, 20), "Consumer5").start();
  }
|
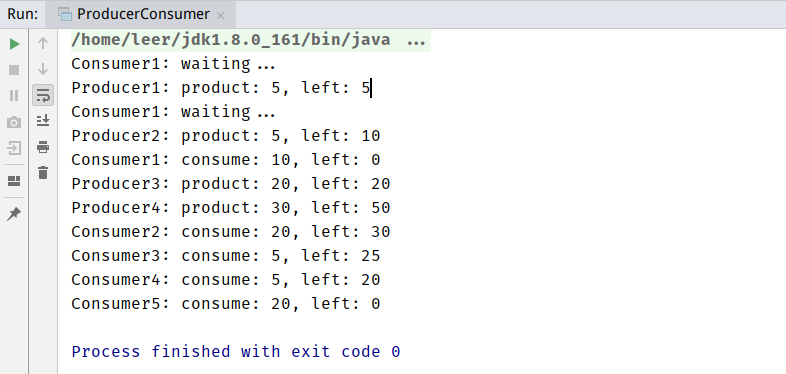
结果如下:
finalize
finalize方法会在GC发生时被调用。
在《深入理解Java虚拟机》中有对这个方法的详细讨论。不过我是大二上的时候看的,现在差不多忘光了,而且当时没有做笔记只留下练习敲的代码,很尴尬。所以就等我看到JVM那部分时再来补充这块吧(